8. FAQ

8-3. Other inquiries

About setup/accessories

About settings

About live streaming

Other

8-2. Troubleshooting

Error messages

Booting/Start Up issues

Setup issues

Broadcasting issues

1. Video Issues

2. Sound Issues

3. Other broadcasting issues

Other issues

Supported broadcasting services

Broadcasting services Setup Panorama Mode Support
YouTube Live Select from the “Broadcasting Service” menu
Niconico live Select from the “Broadcasting Service” menu
Twitch Select from the “Broadcasting Service” menu
Ustream Select from the “Broadcasting Service” menu
Facebook Live Select from the “Broadcasting Service” menu
FRESH! by AbemaTV Select from the “Broadcasting Service” menu
TwitCasting Select from the “Broadcasting Service” menu
LINE LIVE Select from the “Broadcasting Service” menu
SmartSTREAM Use “Other broadcasting service settings (RTMP)”
SHOWROOM Use “Other broadcasting service settings (RTMP)”
J-Stream Equipmedia Live Edition Use “Other broadcasting service settings (RTMP)”
Wowza Use “Other broadcasting service settings (RTMP)”
Akamai Use “Other broadcasting service settings (RTMP)”
ULIZA Use “Other broadcasting service settings (RTMP)”
Classtream Use “Other broadcasting service settings (RTMP)”
vimeo Use “Other broadcasting service settings (RTMP)”

– Officially Supported Broadcasting Service – Broadcasting to this service is integrated into Dashboard for ease of setup.

– Authorized Broadcasting Service – You can broadcast to this service by manually setting up within Dashboard.

Cannot connect with Google account on Dashboard

About this Page

Since December 2019, there has been a problem where the Google account cannot be used on the Dashboard.
This problem has had the following impact.

Impact of this Problem

Not being able to use Google account with the Dashboard impacts operation in the following two ways.

  • Cannot log in using Google account
  • [YouTube Live] cannot be selected and livestream using the livestreaming destination service

When using your Google account to log in and YouTube Live is selected as the livestreming destination, a screen like that shown below is displayed.

Prospects for Eliminating this Problem

The process is currently waiting for verification from Google.
It might take time for Google to conduct their investigation, so as of April 2020, there is no detailed estimate for the recovery period.

Method for Preventing Reoccurrence of the Problem

●If you cannot log into the Dashboard using your Google account

If up to now you have logged into the Dashboard using your Google account, you will need to create a new Dashboard account.
Please use the following method to create an account.

  1. First, initialize the LiveShell that is being used. Please refer to the respective LiveShell manual for the initialization method.
    • LiveShell PRO initialization
    • LiveShell 2 initialialization
    • iveShell X initialization
  1. Access the Dashboard and click on [Sign up]. Please log out if you are already logged into the Dashboard.
  2. Enter your email address, password.
    When you have finished entering all the items, please review the Terms of Use and Privacy Policy and then click on [Create account].
  3. An email from Cerevo will be sent to the email address entered during the above step, so clink on the URL link in that email.
  4. Access the Dashboard and enter the set email address and password to log in.
  5. Follow the screen to arrive at “Select a broadcasting service.”
  6. If you want to use YouTube to be the livestreaming destination, select “RTSP Server Mode” instead of YouTube.
    If you plan to use a livestreaming destination other than YouTube, select the livestreaming destination you plan to use.
  7. After selecting the livestreaming destination, follow the screen to proceed to complete the Dashboard login.
    When the login to the Dashboard is completed, the following screen will be displayed.
    When livestream to YouTube Live, after the following log in after this, conduct the procedures for  livestream to YouTube Live.


Method for livestreming to YouTube Live after logging into the Dashboard

At the current time, the error will happen if you select YouTube Live as broadcasting destination. Use the following method to livestream to YouTube Live.

  1. Access YouTube and log in.
  2. Click on the video camera icon at the top right of the screen and then click on [Go live].It will then be possible to access YouTube Studio.
  3. When you have accessed YouTube Studio, click on [Stream].
  4. To use the previously used settings unchanged, press [COPY AND CREATE].
    To create new settings, press [NEW STREAM].

    After that, enter the required items to create the live stream.
  5. Click on [STREAM SETTINGS] and confirm that “Streamkey” and “Stream URL” are displayed.
    If they are displayed normally, leave this page open because this information is required for the following procedure.
  6. Log into the Dashboard.
  7. Click on [Settings] at the top right of the Dashboard main screen.
  8. Select [Other broadcasting services(specify RTMP URL)].
  9. Copy and enter the URL confirmed during Step 5 of “Stream URL.”
    For “Steam” as well, copy and enter the “Stream Key” displayed in the page left open in Step 5.
    It is alright if the “Browsing RTMP URL” is empty and “Use RTMP Verification” is not checked.
  10. When the message “Saved and will broadcast to this service next time.” is displayed, press the [x] button at the top right of the window to close the window.
  11. Click on [START LIVE] at the top of the Dashboard.
  12. The YouTube page will open again.
    Conducting [Distribution Start] from the Dashboard using the above procedure will display a preview at the top of the YouTube page (It may take from several seconds up to around 30 seconds from clicking [START LIVE] to when the preview is displayed.).
    When the preview is displayed, confirm the desired image is being displayed.
    When you have confirmed this, click on [Go Live] to start actual distribution.


When selecting a YouTube Live event, the event does not load

This issue occurs when you have already created a YouTube Live event that does not have a specified start time.

Please follow the steps below to delete the YouTube Live event. After that, please re-create the event from Dashboard.

  1. Open YouTube Studio
  2. Select “Start Live Streaming”
  3. Select “Encoder Delivery”
  4. Select “Share” (arrow icon on the top right corner of the screen)
  5. Click the video link URL to load the video page.
  6. Select “Edit Video”
  7. Select [Options] (the 3 dot icon on the upper right of the screen, next to [Save]), and then select [Delete]
  8. Check “I understand that deleting is permenant and can’t be undone”
  9. Select “Delete Forever”

After the above actions, you will be able to re-create the event in Dashboard and it will be displayed.

How to set up Screen Saver

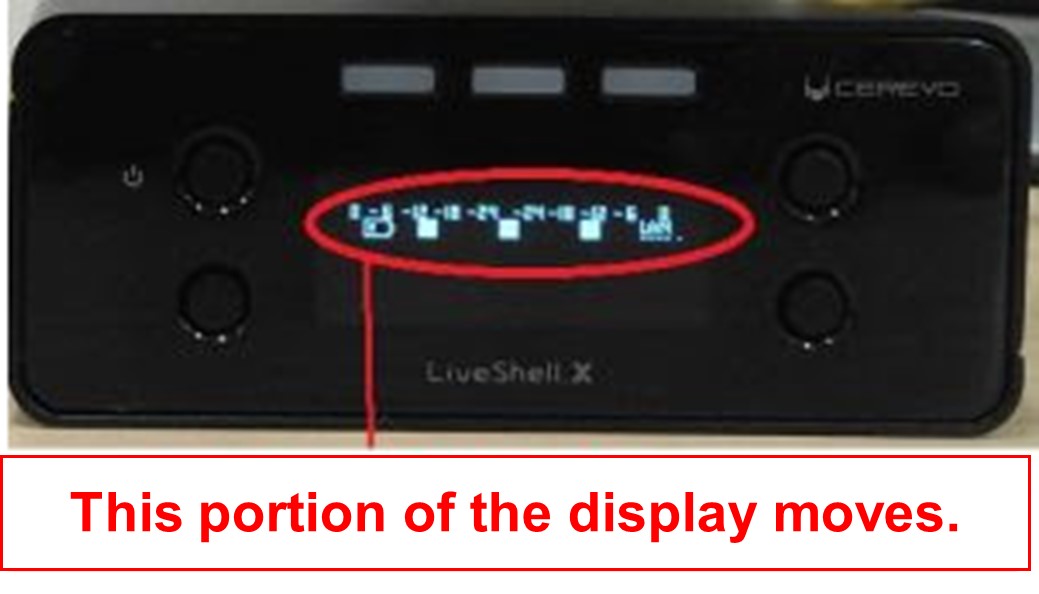
LiveShell X has an OLED front display panel. We recommend using the LiveShell X screen saver function in order to avoid discoloration of the display panel if you use LiveShell X for continuous operation.  

When the screen saver is turned on, the display information will move up and down to prevent screen burn-in when the main unit buttons are not used after the specified time. 


You can set up the screen saver by following these steps.

When LiveShell X is OFFLINE

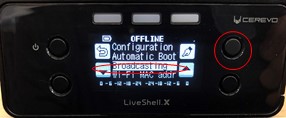
1. Make sure the home screen is displayed on the device. The home screen displays a power icon and a spanner icon. Push the upper right button until “Configuration” is shown.


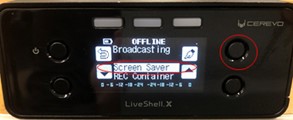
2. Select “Broadcasting” by pushing the lower right or left button, then press the upper right button to confirm.


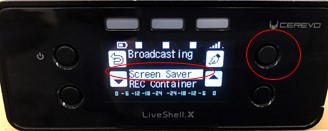
3. Select “Screen Saver” by pushing the lower right or left button, then press the upper right button to confirm.


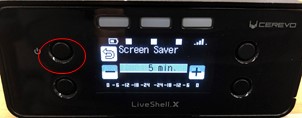
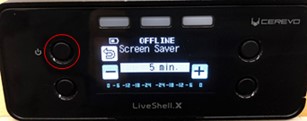
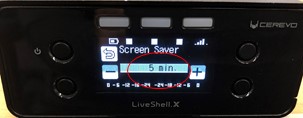
4. Select the number of minutes before the screen saver is displayed by pushing the lower left or lower right button.


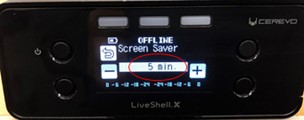
5. Push the upper right button to confirm your settings.


When LiveShell X is ONLINE

1. Make sure LiveShell X is ONLINE. Push the upper right button and select “Broadcasting”.


2. Select “Screen Saver” and push the upper right button.


3. Select the number of minutes before the screen saver is displayed by pushing the lower left or lower right button.


4. Push the upper right button to confirm your settings.