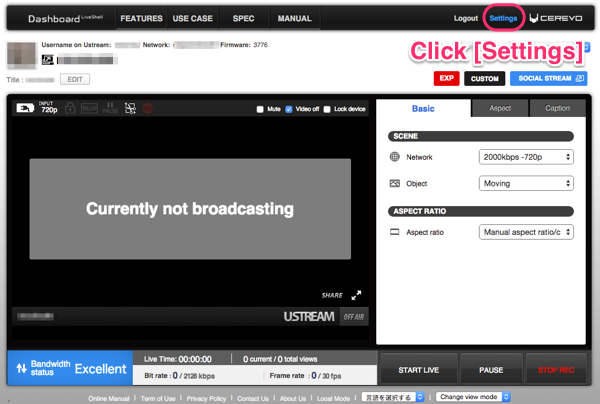
- Click [Setting] right-top of the Dashboard main screen.
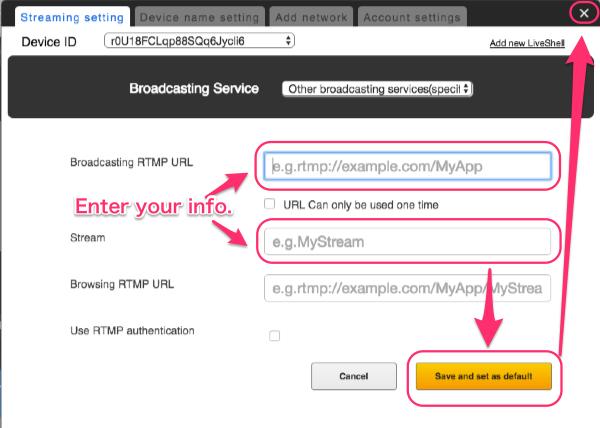
- Select [Other broadcasting services] from pulldown list of Broadcasting Service, and click [Broadcast this service] button (this button will not show for the first time).
- Enter your RTMP server(streaming service) information and click [Save and set as default] button.Then click [x] to close set up window.
LiveShell PRO
5-6. Other broadcasting service setting
5-7. Settings as an RTSP server
Receiving video/audio from RTSP server
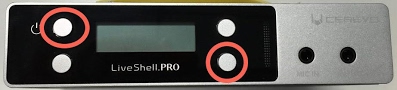
- The LiveShell PRO will display the RTSP server’s URL.
- Press the right bottom button 5 times after the setting is finished.
* You can not see the video from the RTSP server at the Dashboard.
* Install the following software to confirm the RTSP server.
System requirements for the RTSP player:
- Windows, Mac, Linux: VLC 2.0.5
- iOS(iPhone4S, iPad, iPad mini): GoodPlayer
- Android: MX Player
Restriction of RTSP server
- A total of three clients can access the serve at any given time. More than three clients will cause a distorted video and intermittent audio.
- If the video resolution or profile is changed, the client needs to restart the program.
- If the audio sampling rate is changed, the LiveShell PRO may be offline and may need to be restarted.
Operation by Dasboard
- Even if video from RTSP server is not displayed, the video quality, and audio quality can be changed.
- If the RTSP server is set up on local mode, the operation by Dashboard does not work.
Use with Wirecast PRO
- RTSP server function of LiveShell PRO has a ASIX M1104 compatible mode. (video only)
- When the LiveShell PRO is on standby for the RTSP server, the Wirecast PRO can recognize the camera source if M1104 is set as a model and the LiveShell PRO’s IP address is set.
- The IP address for the Wirecast PRO that the IP address part from the RTSP URL which displayed on the LiveShell PRO’s LCD.
5-8. YouTube Live setting
As note in section 2-1e , you need to proceed steps in YouTube before start YouTube Live in Cerevo Dashboard.
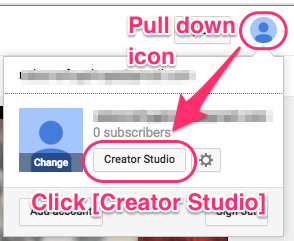
- Login YouTube and pull down your user icon menu and click [Creator Studio].
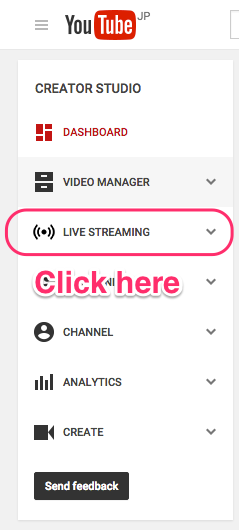
- Click [LIVE STREAMING] from the left side of menus.
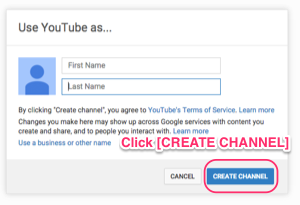
- If you didn’t create your own channel, your will see this pop-up window and click [CREATE CHANNEL].
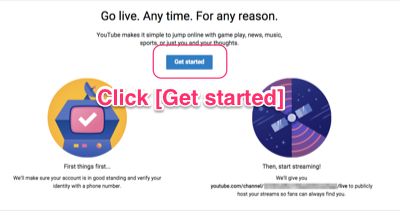
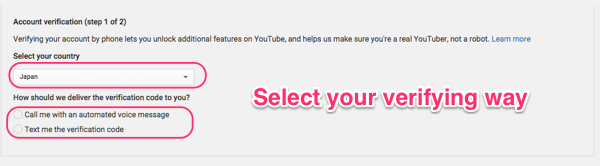
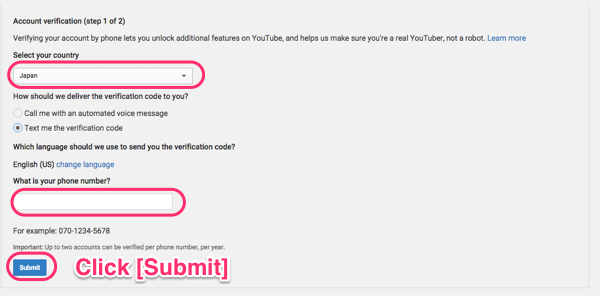
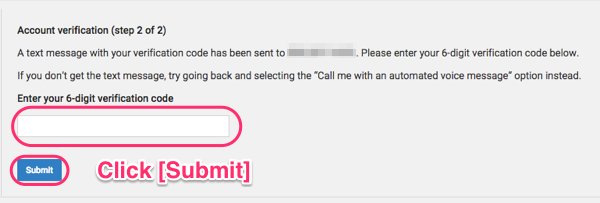
- For the first time to create your own channel Google will request verifying your account with Phone(SMS) authentication.Click [Get started] and follow authenticaion steps.
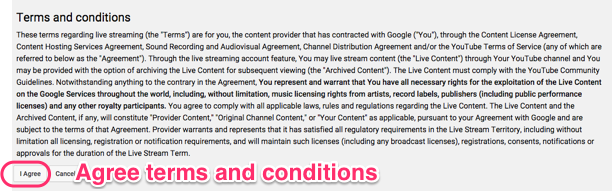
- Agree with terms and conditions.
- Done(YouTube part).Then login to Cerevo Dashboard and click [Settings].
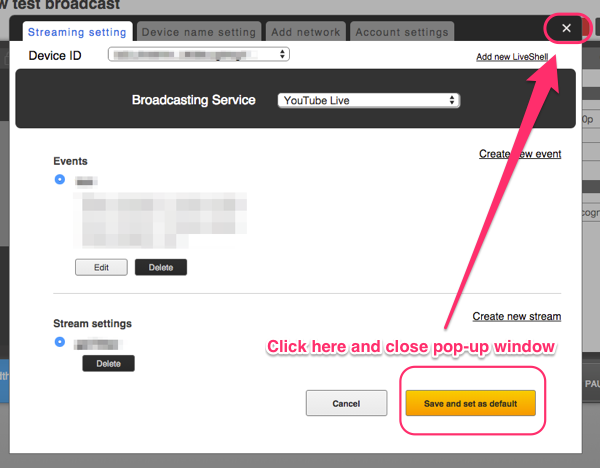
- Select [YouTube Live] and create new event and new stream.

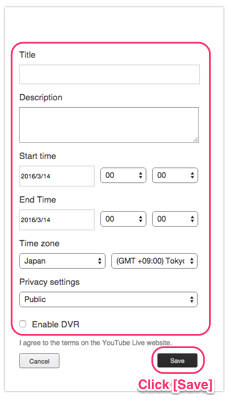
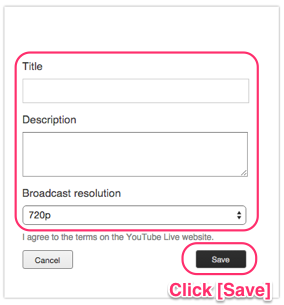
- Click [Save and set as default] and close pop-up window.
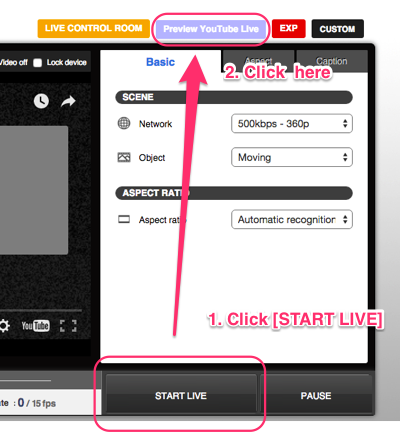
- Then you will see Dashboard main panel and [preview YouTube Live] button.First, click [START LIVE] at the right-bottom, and then click [preview YouTube Live].
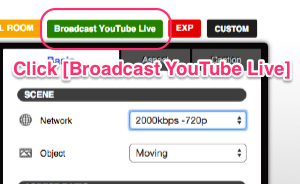
- Then the preview will start and [preview YouTube Live] change [Broadcast YouTube Live].click [Broadcast YouTube Live] and enjoy :)
- If you would like to broadcast by [Stream now](beta) feature, follow step6 above and go to section 2-1c.
5-9 Twitch settings
Currently, due to a specification change on the platform side, only live-streaming via RTMP URLs, etc. is possible.
We will inform you of the normal live-streaming method as soon as it is available.
▶︎How to live-streaming at RTMP URLs
We will inform you of the normal live-streaming method as soon as it is available.
▶︎How to live-streaming at RTMP URLs
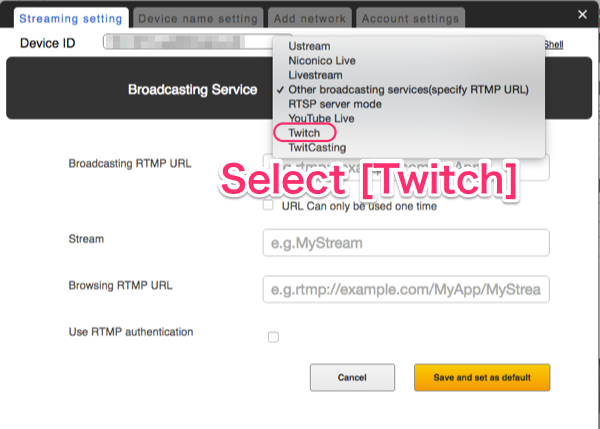
- Click [Setting] right-top of the Dashboard main screen.
- Select [Twitch] from pulldown list of Broadcasting Service.See chapter 2-1g after this step.
5-10 Facebook Live Settings
- Click [Settings] on the top right of Dashboard.
- Select [Other broadcasting services] from the pulldown list of Broadcasting Services.
- See chapter 2-1f. to continue setup.
6. Firmware Update
How to update using device buttons
- Make sure you are offline.
- Connect the AC adapter to the LiveShell PRO.
- Start live streaming so the device LCD changes to “Online”.
- Press the top left device button and select “Power-Off.”
- If a newer firmware has been released, your LiveShell PRO will automatically update the firmware.
Note: Do not unplug the AC adapter or remove the batteries while the firmware is being updated.
How to update using Dashboard
- Connect the AC adapter to the LiveShell PRO.
- Open Dashboard.
- If there is a new firmware update, an update notice will be displayed.

- Click “Update now.”

- Read the update warnings and click “Update.”

- Your LiveShell will begin to automatically update the firmware and will reboot.
Note: Do not unplug the AC adapter or remove the batteries while the firmware is being updated. - The status after rebooting is set by “After Online” settings. (The default is ” Auto Broadcast “)
Release Notes
Firmware Rev.3871(2017.09.01)
Main Improvements
- Fixed the problem that the AXIS IP camera compatibility function did not work.
- Fixed the problem that left and right channels of MIC-IN were reversed.
- Fixed the problem that LiveShell PRO could not receive RTMP Acknowledgment Message and streaming distribution, for example to Wowza Streaming Engine, stops.
Firmware Rev.3841(2016.12.02)
Main Improvements
- Fixed issue where the alert message,”Please use a keyframe frequency of four seconds or less”, is shown in the YouTube Live control room even if required frequency is already set.
- Fixed the problem that LiveShell PRO hangs while stopping live stream when the device displays “Synchronizing Dashboard” or error messages.
- Fixed the problem that LiveShell PRO does not accept commands to restart or to go offline when stopping live streaming while the device displays “Synchronizing Dashboard”.
- Icons now immediately disappear when LiveShell PRO goes offline.
- Added support for vertical crop 9:16 aspect ratio.
Firmware Rev.3832(2016.10.28)
Main Improvements
- Fixed the problem that a higher value than set is displayed as frame rate in RTSP mode.
- Fixed the problem that a false Wi-Fi profile “Wi-Fi#10” appears when deleting a registered Wi-Fi profile.
- Fixed the problem that “DNS error” occurs when LiveShell PRO is offline in RTSP mode then immediately restarts live streaming.
- Fixed the problem that in local mode an unexpected number is displayed.
- Changed the wording of error message “unknown error”.
- Fixed the problem that LiveShell PRO does not connect to Dashboard when name resolution fails.
Firmware Rev.3814(2016.06.10)
Main Improvements
- Fixed the problem that an error occurs when using USB modem.
- Added support for Huawei E3131s-2 USB modem (additional device-ID support).
- Added support for Huawei E3251s-2 USB modem.
- Changed default settings for live streaming.
- Changed processes that LiveShell PRO executes when using USB modem.
Firmware Rev.3779(2016.03.17)
Main Improvements
- Fixed the problem that in RTSP mode LiveShell PRO cannot broadcast normally
Firmware Rev.3774(2016.02.25)
Main Improvements
- Fixes the problem that LiveShell PRO cannot connect to some 5GHz Wi-Fi AP.
Firmware Rev.3769(2016.01.27)
Main Improvements
- Fixed the problem in RTSP mode that audio settings do not update until livestreamimg stops.
- Added support for 4G LTE/USB adapter (LG L-3D, Huawei E3131s-2).
- Added support for Wi-Fi/USB adapter (CDP-WF02A with 2.4GHz and 5GHz support).
Firmware Rev.3737 (2015.11.18)
Main Improvements
- Added properties(audioonly, videoonly, avcprofile, avclevel and aacoat) to onMetaData Object of RTMP live streaming.
- Added a menu to show Wi-Fi MAC address.
- Added changes to make timestamps, including AVC/AAC sequence headers, always increase.
Firmware Rev.3663 (2015.5.15)
Main Improvements
- Fixed the problem that the following menu Broadcasting becomes English even if the language set to Japanese.
Firmware Rev.3662 (2015.2.5)
Main Improvements
- Fixed the problem that can not connect some kind of WiFi AP.
Firmware Rev.3660 (2015.1.6)
Main Improvements
- Fixed the problem that can not find some kind of SSID.
Firmware Rev.3637 (2014.10.10)
Main Improvements
- Fixed the problem that can not connect some WiFi AP.
Firmware Rev.3636 (2014.10.9)
Main Improvements
- Fixed the problem that the frame rate does not increase thereafter if FPS is set 0 when it is set to a variable frame rate.
Firmware Rev.3624 (2014.5.15)
Main Improvements
- Fixed the problem that video biterate was kept low continuously in the local mode.
- Fixed the problem that the fine shift occurs to the time stamp on the RTMP delivery time.
- Modified to perform automatically restart the abend
Firmware Rev.3592 (2014.2.25)
Main Improvements
- Fixed an issue in which can fail to recognize the HDMI input when it was turned on the power.
Firmware Rev.3518 (2013.8.20)
Main Improvements
- Improved the problem that the key input of the LiveShell PRO becomes ineffective.
Firmware Rev.3514 (2013.7.18)
Main Improvements
- Changed Dashboard API access to HTTPS for security issues.
- Fixed a problem where the device could not detect a disconnect cable when used with a fixed IP and Ethernet (not WiFi).
- Fixed a problem where the device could not broadcast the initial time when it had been changed from the RTSP server mode to the RTMP mode.
Firmware Rev.3495 (2013.4.8)
Main Improvements
- Support RTSP server function.(Support act as Wirecast IP camera source for AXIS M1104)
- Fixed a problem where the wrong color was entered for YUV and RGB.
Firmware Rev.3484 (2013.3.13)
Main Improvements
- Fix the problem stating that the Audio display adjustment is broken.
Firmware Rev.3483 (2013.3.8)
Main Improvements
- Supported RTMP authentication of LimeLight and Akamai.
- Fixed a problem that reconnected when LiveShell was on high load.
Firmware Rev.3480 (2013.1.23)
Main Improvements
- Fixed a problem where the device repeatedly disconnected and reconnected every 16.777 second in other RTMP service.
- Fixed a problem where there was a a delay in reconnecting.
- Support LimeLight RTMP Authentication.
- Fixed a problem where the status does not allow a custom mode even if mono / statements of the audio from the Dashboard are set to custom, and the setting reverts when it goes offiline.
- Support monitor output in paused.
Firmware Rev.3457 (2012.12.6)
Main Improvements
- Fixed a problem where the aspect of AV-IN can not be changed if manual crop setting in HDMI is set.
- Fixed a problem where the last image is kept to output in monitor output when you stop livestreaming.
- Support change mode of monitor output NTSC or PAL.
- Improve the stability of the wireless LAN connection
7. Reset / Initialize
Reset
Note: The LiveShell PRO should only be reset when it is not in the normal operating mode.
- Press and hold the power upper left side and the lower right buttons at the same time for 20 seconds.
- The LiveShell PRO is now turned off.
Initialize (Factory Reset)
- Once the display states that the LiveShell is offline, press the button at the top right.
- Select “Initialize” by pressing the lower left button. Press the top right button and display initializing screen.
- Select “Yes” by pressing the lower right button and go to initialize by pressing the top left button.
Note: The firmware version is intact even after initialization.
6-3. FAQ
Specification of breakout cable
The end is 3.5mm 4pole mini plug. It is L, R, GND, Video from the head.
At the other end are male red, white and yellow RCA connectors.
The signal is NTSC.
Bandwidth requirement of LiveShell PRO
If the network upload speed is around 300kbps broadcasting at 3~5fps video with low quality sound will be possible. For high quality live streaming an average upload speed of 2Mbps is required.
Network requirement of LiveShell PRO
Please check with the network administrator about communication availability with the following ports on the server.
* Port forwarding setting isn’t needed.
LiveShell PRO works normally if it set up in NAT. (Please note that the firewall does not block the connection to the below ports.)
The connection and broadcasting to ustream.tv and Niconico Live need capability to connect the port #1935 of arbitrary subdomain of ustream.tv and live.nicovideo.jp.
LiveShell PRO does not support the connection via proxy.
The network proxy setup required can be used for using Dashboard but it requires communication by Websocket or Flash.
- Use LiveShell PRO:
- common settings
- s.cerevo.com, shell.cerevo.com
- TCP: 80, 443
- wss02-shell.cerevo.com
- TCP: 999
- s.cerevo.com, shell.cerevo.com
- Use Ustream:
- ustream.tv, *.ustream.tv
- TCP: 80, 1935
- ustream.tv, *.ustream.tv
- Use Niconico Live:
- live.nicovideo.jp, *.live.nicovideo.jp
- TCP: 80,443,1935
- live.nicovideo.jp, *.live.nicovideo.jp
- common settings
- Use Dashboard (by web browser):
- s.cerevo.com, shell.cerevo.com, wss02-shell.cerevo.com
- TCP: 80, 443
- s.cerevo.com, shell.cerevo.com, wss02-shell.cerevo.com
Nothing happens during network setup with audio download
Check if the audio is coming out of the PC, Mac or Smartphone which you used for network setup.
Check if the audio cable is firmly connected to both devices.
Audio or video cannot be played on your PC, Mac or Smartphone during network setup.
Remove any ethernet LAN cable connected to your LiveShell.
After Wi-Fi setup, LiveShell PRO says “LIVE” but Dashboard main panel is not shown
→ Exit your web browser and access http://shell.cerevo.com/ again.
Echoing in the Audio
Make sure you do not have the Dashboard main panel and the Ustream broadcast screen open at the same time, or two screens of either of these.
Close one of the screens or turn the volume in one of them down to zero, and then check again. Make sure the same audio is not being input into the HDMI and AV IN or the HDMI and MIC IN.
Turn the volume to zero for either screen using the Volume tab in the Dashboard main panel.
Can’t broadcast video and audio but Ustream site says “LIVE”
Make sure your camcorder powered ON and don’t use auto power off function.
Do not use Ustream Broadcaster at same time.
If you use it, close it and stop all broadcast. Take 15min before restart.
Set other Ustream channel to your LiveShell and make sure you can broadcast without problem.
Livestream
LiveShell PRO supports only Original (http://original.livestream.com/guide/livetv) Livestream, not new Livestream. New Livestream does not provide a RTMP URL so LiveShell PRO cannot support it.
How to force shutdown LiveShell PRO
In the event of errors or other problems you can force shutdown LiveShell PRO with the following instructions.
- Press and hold the upper left side and the lower right buttons at the same time for 20 seconds.
- The LiveShell PRO is now turned off.
Using HDMI splitters
We recommend that you connect LiveShell PRO to a HDMI output device (camera, PC, etc.) using a single HDMI cable.
If you use a HDMI Splitter
Cerevo does not recommended specific splitters and cannot guarantee operation when using a splitter. If LiveShell PRO is damaged by a splitter the warranty may be void.
