5. Settings

5-1. Add network

Add/change network connection
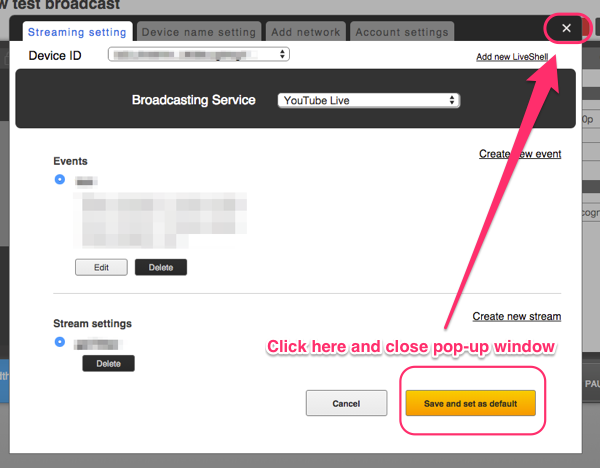
Settings

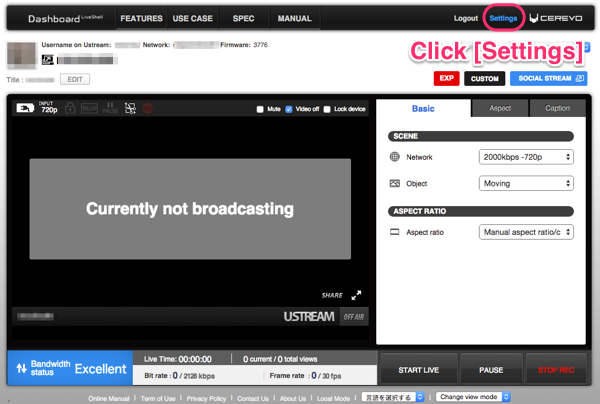
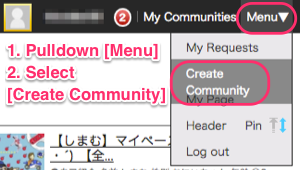
  1. Click the “Settings” link on the top right of Dashboard.
    ub202_en_cap_setting01
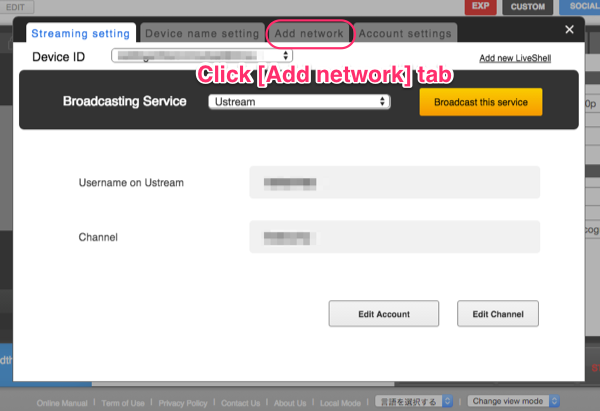
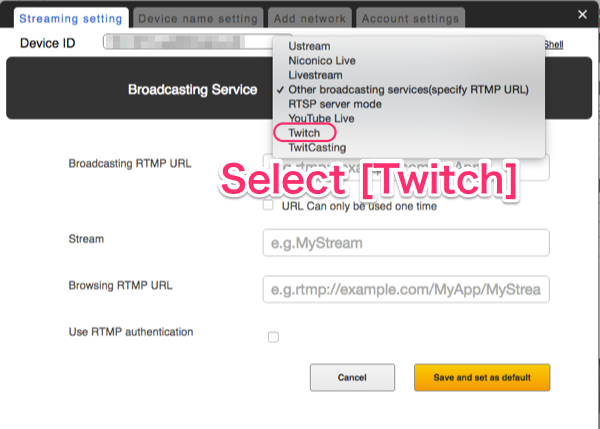
  2. Select the “Add network” tab.
    ubx_en_cap_setting02
  3. If you are adding a Wi-Fi network, click [Wireless(Wi-Fi)] from the left menu, enter the new ESSID and passphrase and click the [OK] button.
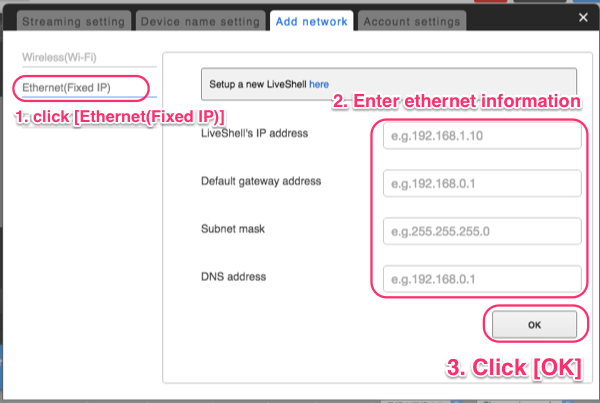
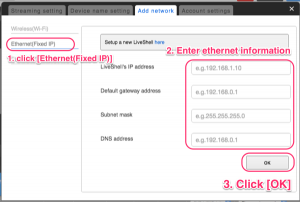
  4. If you are adding a static IP Ethernet network, click [Ethernet(Fixed IP)] from the left menu, enter the new Ethernet network information and click the [OK] button.
    ubx_en_cap_addnetwork88
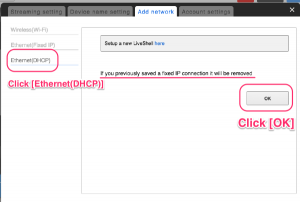
  5. If you are adding a new DHCP ethernet network, click [Ethernet(DHCP)] from the left menu and the click [OK] button. If you have previously added a static IP Ethernet connection it will be deleted.
    ubx_en_cap_addnetwork77
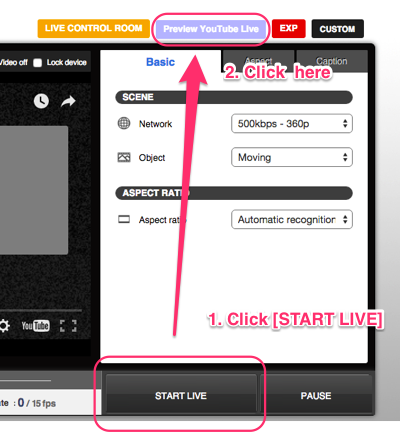
  6. Connect the cables as shown, and press the play button.
    ubx_en_cap_addnetwork99
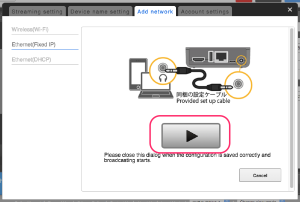
  7. If [LIVE] is displayed on the device LCD screen, the new connection has been added successfully.

Note : Adding Ethernet network connection (DHCP)

If the new network being added can acquire the IP address through a DHCP server, a new configuration does not need to be added.

* Once the Ethernet cable is connected, the LiveShell 2 can be used.
* If the LiveShell is configured with a static IP address, the configuration should be changed to allow for a DHCP enabled network.

Note : Adding Wi-Fi networks

The most recently saved network is assigned the lowest number on the list (Wi-Fi No.). If the LiveShell 2 discovers multiple wireless APs, it will use the most recently added network.

  • The 10 most recent networks can be stored at any given time.

The LiveShell cannot discover a stealth ESSID wireless AP, if one is being used, the access point will need to be reconfigured.

5-2. Ustream account settings

To change saved Ustream account settings.

  1. Click “Settings” on the top right of Dashboard.
  2. Click “Edit Account.”
  3. Enter new account information for Ustream and click “Get Channel.”
  4. Select a channel for broadcasting.
    * If the device is already using a channel, selecting another channel may cause errors.
  5. Click “Save and set as default.”
  6. Dashboard will state “Saved and LiveShell will broadcast to this service next time.” when the Ustream account settings have been changed successfully.

5-3. Ustream channel settings

To change Ustream live streaming channels.

  1. Click “Settings” on the top right of Dashboard.
  2. Click “Edit Channel.”
  3. Select a new broadcasting channel.
    * If the device is already using a channel, selecting another channel may cause errors.
  4. Click “Save and set as default.”
  5. A message will read “Saved and LiveShell will broadcast to this service next time.” after successfully updating the broadcast channel.

5-4. Dashboard user account settings

Account settings

Link/Unlink your current Dashboard account with Facebook or Google account. To link, see section 1-2-1.
ubx_en_cap_removeuserconnect

Change email address

  1. Enter current email address, new email address, and current password then click “OK.”
  2. The message “Check the sent email” will be displayed.
  3. Check your email account for an email from “[LiveShell Dashboard].” Click on the confirmation url in the email.
    dashboard-mail3-en
  4. If the update was successful the updated email address will be displayed in the upper right corner of the screen.

Change password

  1. Enter the current password to log into Dashboard.
    Then, enter the new password you wish to use.
    For confirmation, re-enter the new password.
  2. Click “OK,” and the message “Changed” will indicate a successful change of password.

Delete Account

Click here to delete your Dashboard account.

5-6. Niconico live settings

Currently, due to a specification change on the platform side, only live-streaming via RTMP URLs, etc. is possible.
We will inform you of the normal live-streaming method as soon as it is available.
▶︎How to live-streaming at RTMP URLs

Note: To broadcast on [Niconico Live], you are required to have a niconico paid account and a community (group feature) authorized to broadcast. The steps below are valid as of March 2016, Cerevo cannot guarantee future accuracy.

Steps for broadcasting

    1. Access niconico and click [community] on the header menu to create new one. If you have already created or joined a community authorized to broadcast, skip to step 6.
      ubx_en_cap_2525setting01
    2. Click [Menu] and select [Create community].
      ubx_en_cap_2525setting02
    3. Enter correct information to create a community and click the [Preview] button.
      ubx_en_cap_2525setting03
    4. Confirm your community information and click [Post Update].
      ubx_en_cap_2525setting04
    5. (Optional) We recommend you to click on your community name and bookmark your own community page.
      ubx_en_cap_2525setting05
    6. Click [Live] menu on the header menu.
      ubx_en_cap_2525setting06
    7. Click [Go Live] under the [Menu] pull down from step 2.
      ubx_en_cap_2525setting07
    8. Select the community you created in step 3 and enter broadcasting information, then click [Confirm].
      ubx_en_cap_2525setting08
    9. Accept the niconico Live Terms of Use and then click [Start Broadcasting].
      ubx_en_cap_2525setting09
    10. On the Niconico Dashboard, click the [External Tools] tab at the bottom of the preview window.
      ubx_en_cap_2525setting10
    11. Open another window or tab, and access Cerevo Dashboard. If you haven’t registered your niconico account in Dashboard, see section 2-1b. step 3. Then click [START LIVE].
      ubx_en_cap_2525setting11
    12. Niconico live restricts video and audio bitrate at up to 384kbps (night time) and 512kbps (day time). Select the 500kbps preset on the right side of the Cerevo Dashboard preview window and confirm the bitrate below the preview window.
      ubx_en_cap_2525setting12

ubx_en_cap_2525setting13

  • If LiveShell 2 is broadcasting correctly, a [Please watch in NiconicoLive] message will display in the preview window. Due to niconico restrictions the stream cannot be displayed in the Cerevo Dashboard preview window.
  • Preview your stream in the niconico Dashboard and then the click [Go Live!] button on the bottom left of the niconico Dashboard.
    ubx_en_cap_2525setting14
    ubx_en_cap_2525setting15


5-7. RTSP settings

After completing setup, the LiveShell 2 will display the RTSP server’s URL by pressing the bottom right button 5 times.

* You can not view video from the RTSP server in Dashboard.
* Install the following software to view RTSP video.

Recommend RTSP player software:

  1. Windows, Mac, Linux: VLC 2.0.5 or above
  2. iOS (iPhone4S or above, iPad, iPad mini or above): GoodPlayer
  3. Android: MX Player

RTSP server restrictions

  1. A total of three clients can access the server at any given time.  More than three clients will cause distorted video and intermittent audio.
  2. If the video resolution or profile is changed, the client will need to restart their player software.
  3. If the audio sampling rate is changed, the LiveShell 2 may need to be restarted.

 Dashboard operation

  1. Video quality and audio quality can be changed via Dashboard.
  2. If the RTSP server is set up in local mode, operation via Dashboard is not possible.

Use with Wirecast PRO

  1. LiveShell 2 RTSP server mode has an ASIX M1104 compatible mode. (video only)
  2. When LiveShell 2 is on standby for the RTSP server, Wirecast PRO can recognize the camera source if M1104 is set as a model and the RTSP server IP address is set.
  3. The IP address for Wirecast PRO is the IP address part from the RTSP URL which is displayed on the Dashboard.

5-8. YouTube Live settings

As noted in section 2-1e , you need to set up YouTube streaming before you start YouTube Live in Cerevo Dashboard.

  1. Login to YouTube and click on your user icon, then click [Creator Studio].
    ubx_en_cap_youtubelive001
  2. Click [LIVE STREAMING] from the left menu.
    ubx_en_cap_streamnowsetting02
  3. If you haven’t created your own channel you will see this pop-up window, click [CREATE CHANNEL].
    ubx_en_cap_youtubelive003
  4. The first time you create your own channel Google will request verification of your account. Click [Get started] and follow the authentication steps.
    ubx_en_cap_youtubelive004
    ubx_en_cap_youtubelive005
    ubx_en_cap_youtubelive006
    ubx_en_cap_youtubelive007
  5. Agree with terms and conditions.
    ubx_en_cap_youtubelive008
  6. Continue by logging in to Cerevo Dashboard and click [Settings].
    ub202_en_cap_setting01
  7. Select [YouTube Live] and create a new event and new stream.
    ubx_en_cap_youtubelive009
    ub200_en_cap_youtubeinitsetup03
    ub200_en_cap_youtubeinitsetup04
  8. Click [Save and set as default] and close the pop-up window.
    ubx_en_cap_youtubelive010
  9. From the Dashboard main window, first click [START LIVE] on the bottom right and then click [Preview YouTube Live].
    ubx_en_cap_youtubelive011
  10. The preview will start and the [Preview YouTube Live] button will change to [Broadcast YouTube Live]. Click [Broadcast YouTube Live] to start broadcasting.
    ubx_en_cap_youtubelive012
  11. If you would like to broadcast using YouTube Stream now, follows steps 1-5 above and go to section 2-1c.

5-9. Twitch settings

Currently, due to a specification change on the platform side, only live-streaming via RTMP URLs, etc. is possible.
We will inform you of the normal live-streaming method as soon as it is available.
▶︎How to live-streaming at RTMP URLs
  1. Click [Settings] on the top right of Dashboard.
  2. Select [Twitch] from pulldown list of Broadcasting Services.
    ub20x_cap_en_twitch01
  3. See chapter 2-1g. to continue setup.